
LVM (Logical Volume Manager) — это уровень хранения данных в Linux, позволяющий рассматривать несколько дисков (или разделов) как единый гибкий пул дискового пространства. С помощью LVM можно расширять тома в режиме реального времени, создавать моментальные снимки, настраивать зеркала и перестраивать систему хранения без переустановки ОС.
LVM встроен в ядро Linux (через device-mapper) и является одним из самых полезных инструментов системного администратора при управлении VPS, выделенными серверами, базами данных, файловыми хранилищами, резервными копиями и растущими проектами.
Уровни LVM (простое объяснение):

Установите инструменты LVM (пакет lvm2) с помощью менеджера пакетов вашего дистрибутива:
# Ubuntu / Debian
apt update
apt install -y lvm2

# RHEL / CentOS Stream / Rocky / Alma
dnf install -y lvm2

# Older CentOS
yum install -y lvm2
Убедитесь, что команды LVM доступны:
pvs
vgs
lvsПример настройки: у вас есть два дополнительных диска, подключенных к серверу, например /dev/vdb и /dev/vdc.
Шаг 1 — определите диски:
lsblk
fdisk -l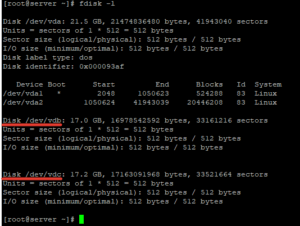
Важно: будьте на 100% уверены, что вы выбрали правильные диски. На производственных серверах неправильная команда может привести к потере данных.
Шаг 2 — инициализация дисков в качестве физических томов (PV):
pvcreate /dev/vdb /dev/vdc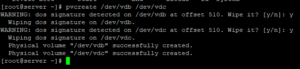
Проверьте состояние PV:
pvdisplay
pvs
Шаг 3 — создание группы томов (VG). Здесь мы назовем ее test:
vgcreate test /dev/vdb /dev/vdcПроверьте VG:
vgdisplay
vgs
Шаг 4 — создайте логический том (LV). Пример: LV объемом 5 ГБ с именем test1 внутри VG test:
lvcreate -L 5G -n test1 testПолезные примеры:
# Use 40% of VG capacity:
lvcreate -l 40%VG -n data test

# Use all free VG space:
lvcreate -l 100%FREE -n data test
Проверьте LV:
lvdisplay
lvs
lsblk
Создайте файловую систему. Для общих целей выберите ext4. (Если вы используете XFS, обратите внимание: XFS нельзя уменьшить.)
# ext4 example:
mkfs.ext4 /dev/test/test1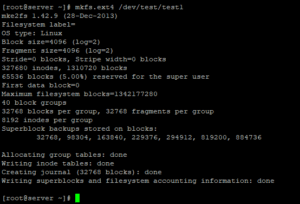
Создайте точку монтирования и смонтируйте ее:
mkdir -p /var/www/home
mount /dev/test/test1 /var/www/home
Сделайте монтирование постоянным после перезагрузки, добавив запись в /etc/fstab:
nano /etc/fstab/dev/test/test1 /var/www/home ext4 defaults 0 2Примените и проверьте:
mount -a
df -h
lsblk -f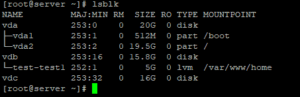
Существует два распространенных сценария расширения:
Расширить LV (пример: добавить 10 ГБ):
lvextend -L 10G /dev/test/test1Затем измените размер файловой системы:
# ext4:
resize2fs /dev/test/test1

# xfs (if you used XFS):
# xfs_growfs /var/www/home
Если сначала необходимо добавить новый диск:
pvcreate /dev/vdd
vgextend test /dev/vdd
Предупреждение: уменьшение объема сопряжено с риском. Делайте это только при наличии резервных копий. Также помните: XFS нельзя уменьшить. Приведенная ниже безопасная процедура уменьшения предназначена для ext4.
1) Размонтируйте:
umount /var/www/home
2) Проверьте целостность файловой системы:
e2fsck -fy /dev/test/test1
3) Сначала уменьшите файловую систему (пример: до 4 ГБ):
resize2fs /dev/test/test1 4G
4) Уменьшите LV соответственно (пример: уменьшите до 4 ГБ):
lvreduce -L 4G /dev/test/test1
5) Смонтируйте обратно и проверьте:
mount /dev/test/test1 /var/www/home
df -h
Чтобы удалить LVM без потери данных:
umount /var/www/home

lvremove /dev/test/test1
vgremove test
pvremove /dev/vdb /dev/vdc
Зеркалирование в LVM хранит одни и те же данные на нескольких дисках (аналогично RAID1). Это повышает отказоустойчивость, но уменьшает объем доступного пространства.
Классический пример (два диска):
pvcreate /dev/sdb /dev/sdc
vgcreate vgmirror /dev/sdb /dev/sdc

# Mirror LV (LVM mirror)
lvcreate -L 5G -m1 -n lvMirr1 vgmirror
В современных системах вы также можете использовать типы LVM RAID (например, RAID1), в зависимости от вашего дистрибутива и потребностей.
vg_data/lv_mysql, vg_data/lv_www и т. д.