
*Cube-Host– full cloud services!!
EN
*Cube-Host– full cloud services!!
LVM (Logical Volume Manager) is a Linux storage layer that lets you treat multiple disks (or partitions) as one flexible pool of space. With LVM you can extend volumes online, create snapshots, build mirrors, and redesign storage without reinstalling the OS.
LVM is built into the Linux kernel (via device-mapper) and is one of the most useful sysadmin tools when you manage VPS, dedicated servers, databases, file storage, backups, and growing projects.
LVM layers (simple explanation):

Install LVM tools (package lvm2) using your distribution’s package manager:
# Ubuntu / Debian
apt update
apt install -y lvm2

# RHEL / CentOS Stream / Rocky / Alma
dnf install -y lvm2

# Older CentOS
yum install -y lvm2
Check that LVM commands are available:
pvs
vgs
lvsExample setup: you have two extra disks attached to a server, for example /dev/vdb and /dev/vdc.
Step 1 — identify disks:
lsblk
fdisk -l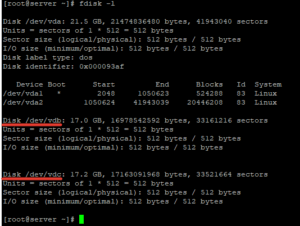
Important: be 100% sure you target the correct disks. On production servers, a wrong command can destroy data.
Step 2 — initialize disks as Physical Volumes (PV):
pvcreate /dev/vdb /dev/vdc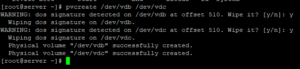
Check PV status:
pvdisplay
pvs
Step 3 — create a Volume Group (VG). Here we name it test:
vgcreate test /dev/vdb /dev/vdcCheck the VG:
vgdisplay
vgs
Step 4 — create a Logical Volume (LV). Example: 5 GB LV named test1 inside VG test:
lvcreate -L 5G -n test1 testUseful examples:
# Use 40% of VG capacity:
lvcreate -l 40%VG -n data test

# Use all free VG space:
lvcreate -l 100%FREE -n data test
Check LVs:
lvdisplay
lvs
lsblk
Create a filesystem. Choose ext4 for general purpose. (If you use XFS, note: XFS cannot be shrunk.)
# ext4 example:
mkfs.ext4 /dev/test/test1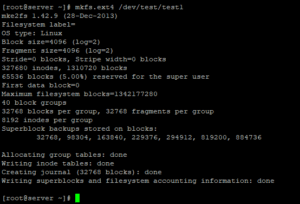
Create mount point and mount it:
mkdir -p /var/www/home
mount /dev/test/test1 /var/www/home
Make the mount persistent after reboot by adding an entry into /etc/fstab:
nano /etc/fstab/dev/test/test1 /var/www/home ext4 defaults 0 2Apply and check:
mount -a
df -h
lsblk -f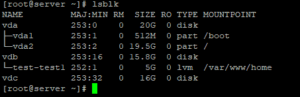
There are two common growth scenarios:
Extend LV (example: add 10 GB):
lvextend -L +10G /dev/test/test1Then resize the filesystem:
# ext4:
resize2fs /dev/test/test1

# xfs (if you used XFS):
# xfs_growfs /var/www/home
If you need to add a new disk first:
pvcreate /dev/vdd
vgextend test /dev/vddWarning: shrinking is risky. Do it only if you have backups. Also remember: XFS cannot be shrunk. The safe shrink procedure below is for ext4.
1) Unmount:
umount /var/www/home2) Check filesystem integrity:
e2fsck -fy /dev/test/test13) Shrink filesystem first (example: to 4G):
resize2fs /dev/test/test1 4G4) Shrink LV to match (example: reduce to 4G):
lvreduce -L 4G /dev/test/test15) Mount back and check:
mount /dev/test/test1 /var/www/home
df -hTo remove LVM cleanly:
umount /var/www/home

lvremove /dev/test/test1
vgremove test
pvremove /dev/vdb /dev/vdcMirroring in LVM stores the same data on multiple disks (similar to RAID1). This increases fault tolerance but reduces usable space.
Classic example (two disks):
pvcreate /dev/sdb /dev/sdc
vgcreate vgmirror /dev/sdb /dev/sdc

# Mirror LV (LVM mirror)
lvcreate -L 5G -m1 -n lvMirr1 vgmirror
On modern systems you may also use LVM RAID types (for example RAID1), depending on your distro and needs.
vg_data/lv_mysql, vg_data/lv_www etc.